
How to use Autoracle
A guide to every part of the app: where things are and which buttons to tap. Buttons in the text look just like in the app: Green — the main action on a screen, White — everything else, Option / Selected — switches, Tile — sections in the “More” sheet. The pictures are real app screens (on a demo car). Can’t find an answer? Write to support@autoracle.app.
Contents
- Getting started
- Car details
- Fill-up from a receipt photo
- Other expenses
- Loans, leasing and income
- Garage visit and service book
- Current condition and tyres
- Mileage
- Reminders
- Statistics and cost per kilometre
- Trips
- OBD adapter: fault codes, gauges, trips
- Trip calculator
- Service schedule
- Chat with Orik
- Shared car and mechanic link
- Share history: QR sticker and mechanic link
- Documents and the “Garage safe”
- Loyalty cards
- Moving from another app and handing over a car
- Checklists
- Search and achievements
- Without internet
- Free and Orik Pro
- Settings, data and security
Getting started
Sign up and sign in
- Open the app and tap Create account. Enter your email and a password (at least 8 characters) and tap Sign up.
- You’ll get an email with a code. Enter it and tap Confirm. No email? Check your spam folder or tap Send the code again.
- Forgot your password — on the sign-in screen tap Forgot password? → email → Send code → the code from the email and a new password → Save password and sign in.
Invited to someone else’s car by email? On the sign-in screen tap I have an invitation: your email, the code from the email and a new password.
Add a car
- At the bottom of “My garage” — “Add a car”: From registration or Manually.
- From registration: 📷 Photograph the registration document (both sides — 📷 + Page), then 🔍 Recognise. Orik fills in make, model, year, VIN, plate, engine and fuel — check the fields.
- Manually: only a name, make, current mileage and fuel type are required — everything else can be added later.
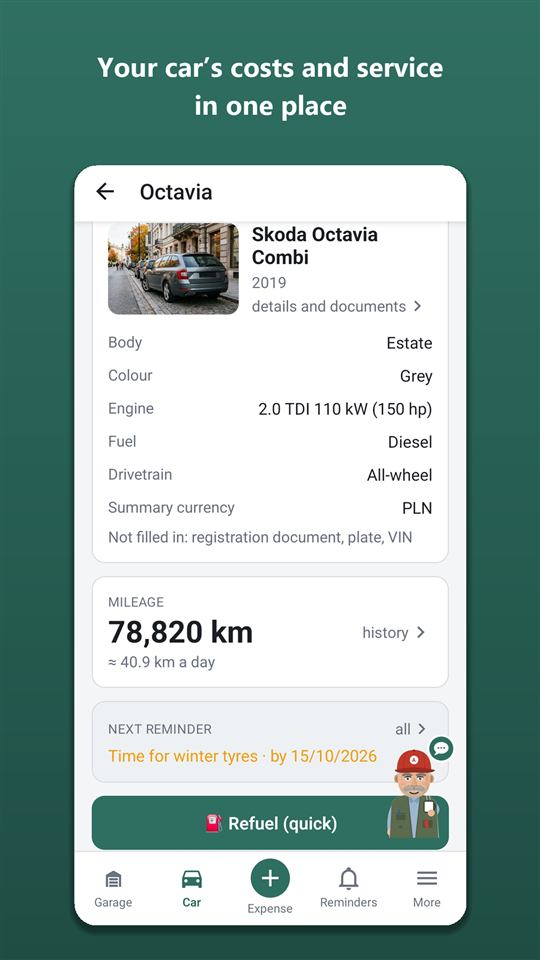
- Tap Save — the car’s dashboard opens.
Every field is explained in “Car details”.
The car dashboard
The car’s main screen. At the top is the car card (tap it to open “Car details”), below it:
- Orik noticed — short observations: fuel price, spending above usual, how often you fill up.
- 📷 Quick expense — photograph any receipt or document: Orik works out what it is and opens the right form; + Add a record — every kind of record, entered by hand.
- Quick-access tiles: Loyalty cards Parking Garage safe Trips Airport Accident: what to do. The magnifier in the dashboard header searches records. The red icon in the dashboard header also opens “Accident: what to do”.
- Mileage — tap the card to open “Mileage history”; + Record mileage adds an odometer reading.
- Next reminder — tap to open all reminders for this car.
- Spent in period — switches Month Quarter Year All Custom; tap the card to open Statistics for the same period.
- Orik in the bottom right corner — tap him to open the chat.
- Orik’s tips — the first time you open the dashboard, and “More”, Orik briefly shows what is where, once. Got it closes a tip, “Don’t show tips again” turns them all off.
Bottom bar and the “More” sheet
Garage — all cars · Car — the dashboard of the open car · — a new record (expense, income, financing, mileage check) · Reminders · More — a sheet with every section.
In the “More” sheet the sections are grouped: Spending and records: Expenses Refuels Statistics Income Financing Export to Excel Search records Maintenance: Service book Condition Service schedule Tyres Mileage history Warranties On the road: Trip calculator Trips Checklists Parking Accident: what to do Car and documents: Garage safe Car details Members Chat with Orik Preparing to sell App: Loyalty cards Achievements Car transfer Accept invitation Orik Pro Settings About.
Forms have no bottom bar — just Cancel and the system Back button.
The “First steps” card
On a new car’s dashboard Orik shows a list: photo, registration, valid insurance, tyre set, first record. Tap an item to go where it’s done; finished items tick themselves. Hide tips removes the card for good.
- If you pay noticeably more or less at one fuel brand than at your others, Orik will mention it too — same fuel, same weeks, discounts included.
Car details
Open: dashboard → tap the car card (or Car details in “More”) → “Car details” → ✏️ Edit details.
What to fill in and why
- Car photo — 📷 Take photo or 🖼 Gallery: you’ll see the car in the garage and on the dashboard.
- Make — start typing and the app suggests: “vw” → “Do you mean Volkswagen?”. Models are suggested for the make.
- Fuel type and second fuel (LPG, CNG + petrol) — each fuel has its own tank and consumption.
- Tank size — Orik notices if a fill-up is bigger than the tank; also needed for “Where to refuel” in the calculator. Electric and plug-in hybrids — battery capacity.
- Drivetrain and operating conditions — for the service schedule (all-wheel drive adds transfer case and axle oils; severe conditions mean shorter intervals).
- Region — the city where you usually drive: type it and tap 🔍 Find. Orik uses it for the weather forecast and winter-tyre laws.
- Dashboard odometer — km or miles: enter mileage as you see it on the dashboard.
- Base currency — every summary for the car is in it.
- Purchase — date, mileage at purchase and price. Mileage at purchase is needed for statistics: the “cost per kilometre over the whole ownership” starts from it.
- Registration document — photos of its pages; it can be recognised to fill the fields.
Tap Save.
Documents on the “Car details” screen
Below the specs are valid insurance, inspection and registration with days left (green — more than a month, orange — less, red — expired). Expired ones are in a collapsed list. Add — + Add document (see “Documents”).
Delete a car
At the bottom of “Car details” — Delete car…: the app shows how many expenses, trips, documents and files will be deleted. Type the car’s name and tap Delete forever. Only the owner can delete; a member leaves via “Members” → Leave this car.
Fill-up from a receipt photo
Log a fill-up
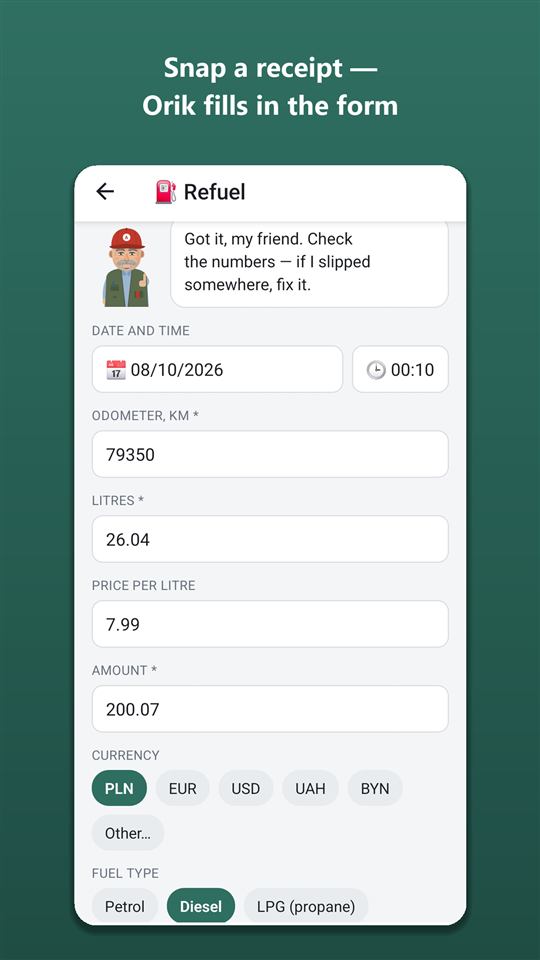
- On the dashboard tap 📷 Quick expense → 📷 Photograph the receipt or document → 🔍 Recognise (1 page). Orik sees that it’s a fill-up and opens the form already filled in. Or → “Fuel” → 📷 Photograph the receipt — there the receipt is recognised right after the shot.
- Orik fills in litres, price, total, fuel grade, station, date and mileage (only if the receipt labels it as mileage). Receipt already on the phone — 🖼 Gallery, a PDF e-receipt — 📎 File.
- Check the fields. No mileage on the receipt — enter it in “Odometer”. Below the field you’ll see the “Last reading” for comparison.
- “Filled to full?” — Yes if you filled until the nozzle clicked. Average consumption is only calculated between two full fill-ups.
- Tap Save.
Recognised data is saved only when you tap “Save” — check the numbers.
Receipt already on your phone — “Share”
Send a photo of a receipt or document, or a PDF, from your gallery, email or messenger: “Share” → Autoracle → pick the car → 📷 Quick expense opens and recognises the pages straight away. As always, nothing is saved until you confirm.
Form fields
- Litres, price per litre and total are linked: change litres or price and the total updates; change the total and the price per litre updates.
- Discount (loyalty card, coupon, “−0.15 per litre”) — a separate field. The total is what you paid, the price is the one on the pump. Orik finds the discount on the receipt; statistics show “Saved with discounts”.
- Fuel type and grade come from the car details and can be changed. A dual-fuel car asks “Which tank did you fill”.
- Station / address: with location allowed, the nearest station fills in by itself. 📍 Detect finds a station near you; 🗺 On the map — pick one on the map by tapping ⛽ or any point.
- Date and time can be changed — add an old fill-up retroactively.
- Electric: instead of “full” — “Charge before, %” and “Charge after, %” from the car’s screen, and “Charging type” Slow (AC) / Fast (DC).
- Diesel: + AdBlue — the AdBlue amount and litres; saved as a separate record so it doesn’t spoil consumption.
Check before saving
If the mileage doesn’t fit neighbouring records, more fuel went in than the tank holds, or the price is far from usual, Orik shows a warning. A typo — fix the field; all correct — tap Save anyway. Open that record shows the record the mileage conflicts with.
“Previous refuel not recorded?”
Skipped logging one fill-up — set Yes: the stretch before this fill-up won’t count towards average consumption, otherwise it would be wrong.
Mileage estimate
With five or more fill-ups with mileage in the app and the mileage field empty, Orik suggests “the odometer should read about N”. Yes, that’s right accepts the estimate (the record gets “≈”), I’ll enter it exactly lets you type it. An exact reading can be added any time: → “Check mileage”.
A receipt with only the total
At some stations (in Belarus, for example) the receipt shows neither litres nor price — only the total. Orik suggests a price per litre: from your previous fill-up with this fuel in the same currency, the median of Autoracle users’ receipts in the country, or the EU bulletin price. Use this price — the litres are calculated from the total and marked “≈”. Remember the price on the pump display? Correct it and the litres are recalculated.
Coffee, screenwash and other purchases on the same receipt
If the receipt has other items besides fuel, an “Also on the receipt” block appears under the total: each item with a tick and a category — “Parts” (screenwash, oil), “DIY maintenance” (car wash, vacuum) or “Station shop” (food, drinks). Tap the category to change it; untick an item and it won’t be saved. Ticked items are saved as separate records together with the fill-up. “Station shop” doesn’t count as spending on the car — see “Other expenses”.
The fill-up list
More → Refuels: every fill-up with litres, price and “full / partial”. 📷 Show receipt opens the receipt photo; tap a fill-up to edit it. Delete — Delete refuel at the bottom of the form.
- Charging at home: for an electric car choose At home — kWh from the wallbox meter, or Only percentages (charge before and after × battery capacity). The amount is calculated from the home tariff in the car details, at night by the night rate; the odometer is optional at home.
Other expenses
Add a record
- Tap on the bottom bar (or + Add a record on the dashboard).
- Pick a tile: ⛽ Fuel · 🔧 Service · 🧽 DIY maintenance · ⚙️ Parts · 📄 Documents · 🛣 Tolls & parking · ⚠️ Fines · 🧾 Tax · 🏦 Financing · 🛒 Station shop · 💰 Income · 📍 Check mileage.
- Fill in the form and tap Save.
Quick expense: any receipt with one button
- On the dashboard tap 📷 Quick expense and shoot the receipt or document — 📷 Photograph the receipt or document.
- Several pages — add the rest (📷 + Page, 🖼 Gallery, 📎 File); nothing is sent until you tap 🔍 Recognise (1 page).
- Orik works out what it is — fill-up, service, parts, car wash, document, parking, fine, tax or shop — and opens the right form with your photos. A fuel receipt comes already filled in; other documents are recognised in their own form.
- Not recognised or no internet — pick the kind of expense yourself; the photos go into the form.
Credits are only charged for recognition in the right form: for identifying anything other than a fuel receipt, the credit is refunded automatically. Where AI isn’t available, Quick expense goes straight to picking the kind of expense.
Recognise a document from a photo
- 📷 Photograph the document (or slip, receipt) — the first page.
- Several pages — add the rest: 📷 + Page, 🖼 Gallery or 📎 File (PDF, Excel .xlsx, Word .docx).
- Tap 🔍 Recognise all pages (2) — Orik reads all pages in one request and fills the fields.
- Check and tap Save. Remove an extra page with the cross on its thumbnail.
Common to all forms
- Date and time can be changed; future dates aren’t allowed.
- 📎 Attachments — Photo Gallery File: policy, invoice, contract, warranty. Attachments are only stored, not recognised. Tap a saved file to open a viewer with ⬇ Download ↗ Share Open.
- Upgrade / tuning? — Yes for rims, multimedia, sound insulation, chip tuning: counted in spending, not in the cost per kilometre.
- Private record (shared cars only) — seen by you and the owner.
Each category
- 🧽 DIY maintenance — wash, top-ups, repairs you do yourself: “What was done” and the cost. Parts for the job — + Add part. Changed the wheels yourself — “Changed the wheels?” Yes.
- ⚙️ Parts — each receipt line separately: name, brand, part number, quantity, price; + Add part — another line.
- 🛣 Tolls & parking — Toll road Parking Space rental. For a rental — the period (Month / Year) and “Paid until”: Orik reminds you to renew (5 days before for monthly, a month before for yearly).
- ⚠️ Fine — “What for” and the amount. “Fine already paid?” No → country, “Pay by” and, if available, “Early payment discount” (Spain, Italy, Turkey, Kazakhstan and others are filled in automatically). Orik reminds you 2 days before the discount ends. Fines never count towards the cost per kilometre.
- 🧾 Tax — “Tax type”: Annual — “Paid until” (one year after payment by default) and “Remind me”: A week before 2 weeks before A month before Don’t remind; One-time — paid at registration or purchase: counted in expenses and cost per km, but not expected again and not in the monthly cost; Other — no schedule. For many countries the form shows the official names of the car taxes; you enter the amount yourself — the app doesn’t calculate it.
- 🛒 Station shop — coffee, food and anything else on the road that isn’t for the car. Log it by hand, from a receipt photo or from the “Also on the receipt” block of a fill-up. It doesn’t count towards spending on the car, the cost per kilometre, the budget or the year in review — in Statistics it has its own block “Station shop in this period” and the cost per 100 km.
- 📄 Documents — see “Documents and the Garage safe”.
Edit or delete a record
Open the record where you see it: fill-up list, “Mileage history”, “Service book”, Statistics → category. Change the fields and tap Save. Delete — the button at the bottom of the form (e.g. Delete visit) and confirm with Yes, delete. Editing and deleting need internet.
All expenses
More → Expenses: every expense record by date — category icon, amount, total for the selected period. At the top — the period Month Quarter Year All Custom and the kinds of expense: All or any categories by tapping (several at once). “Station shop” isn’t included in the total spent on the car — its amount is shown on a separate line. Income, trips and odometer checks aren’t here. Tap a record to open it; at the bottom — an Excel export for the same period.
Tapping a record — in Expenses, statistics, fill-ups, mileage history, search, income and contract payments — first opens its card: what, when, how much, details, files, who added it. To change it, tap Edit.
Loans, leasing and income
Add a financing contract
- → “🏦 Financing” (or Financing in “More”) → + New contract.
- Type: Loan Leasing Instalments Subscription Other; “Who / what for”, currency, payment, “How often”, number of payments, first payment date.
- For a loan or instalments enter the “Loan amount (without interest)” — then the app calculates the interest paid: only that counts as ownership cost (the loan principal is the car’s price).
- “Remind me of payments” — Orik reminds you before every payment. Tap Save.
Log a payment
On the “Financing” screen, the contract has Record a payment: date and amount are filled in, tap Save. The contract shows “Paid N of M”, the next payment and what’s left. Loan paid off — Close contract (paid off) in the contract.
Income
- → “💰 Income”.
- “Source”: Taxi Delivery Reimbursement Freight Insurance payout Car sale Other; amount, currency, date.
- “What work was it for” (taxi, delivery, freight): New (shift) — start, end and km (by odometer, by hand or 🗺 Plan a route), saved as a business trip; From trips — pick an existing trip; No calculation. With a trip the app shows the cost, the profit and profit per km.
- Insurance payout — you can pick the workshop visit with the repair: the difference between payout and repair is shown.
- Save. All income — Income in “More”. Income is saved only with internet.
Garage visit and service book
Log a visit from the work order
- → “🔧 Service”.
- 📷 Photograph the work order, other pages — 📷 + Page (or a PDF — 📎 File).
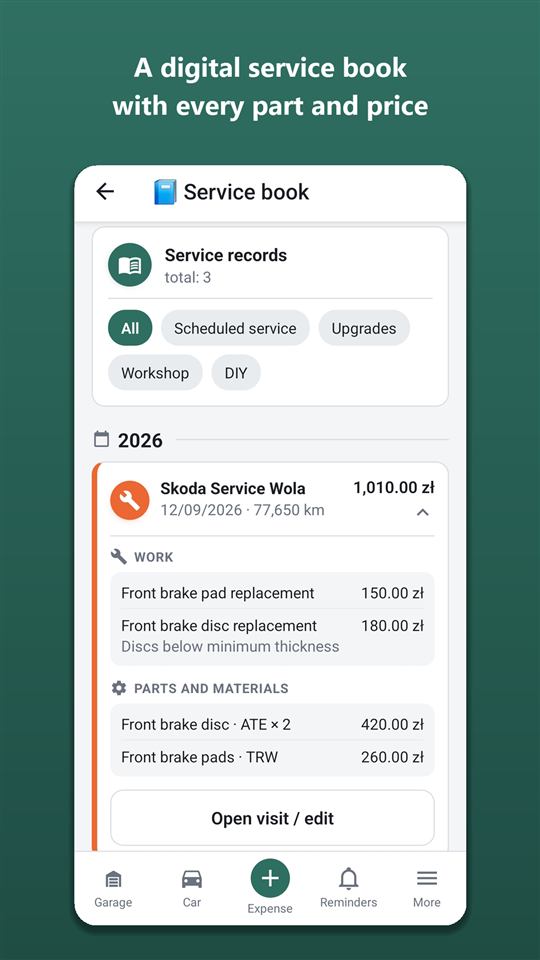
- Tap 🔍 Recognise all pages (2). Orik splits the order into catalogue jobs, parts (name, brand, part number, quantity, price) and the mechanic’s recommendations.
- Check every block, correct what’s needed, tap Save.
Fill in by hand
- Workshop / contacts and visit date.
- Jobs: type “oil change”, “brake pads” in the search and pick from the list. Not in the catalogue — + Other / enter manually with the name as on the order. Any job can have a + Comment.
- Parts and materials: + Add part.
- Scheduled service? — Yes for regular maintenance. A “Which scheduled service, km” field appears (e.g. 40000) — every job of that service in your schedule is marked done.
- Condition check: pads and discs per axle (remaining %, 100 — new), tread in mm, radiator clogging, body notes; each item can have a 📷 Photo.
- Mechanic’s recommendations → reminders: + Add recommendation — “What to do”, mileage or 📅 Or by date. ✓ Create reminder — Orik will remind you; ○ No reminder — just a note.
What the app does by itself
- A “replace pads / discs / radiator” job (or such a part on the order) marks the part as new in “Current condition”, with a note “↺ … by job …”.
- Discs replaced but no data on the pads of the same axle — a Pads (front) replaced too → 100 % button appears.
- Tyre jobs (seasonal swap, balancing, storage…) open the “Tyres” block: whether the set on the car was swapped, tread of the removed set and where it went — right here, at home, with friends — with the storage period and cost; there is also + Old tyre disposal. Storage is saved as a separate record, and a visit with only tyre jobs does not go into the service book.
- Visit total = jobs + parts.
Service book
More → Service book.
- At the top — the car, current condition (tap to open it) and latest jobs: when and at what mileage each was done; Show all (12).
- Service records by year. Filter: All Scheduled service Service DIY Upgrades Checks.
- Tap a visit to expand jobs, parts, recommendations, work order pages and files. Open visit / edit opens the visit form.
- Recalls — manufacturer recalls for your make, model and year from the EU Safety Gate database; checked daily.
PDF extract for a buyer or a garage
- In the service book tap 📤 Share (PDF).
- Choose: “Show prices of work and parts?”, “Show plate and VIN?”, “Completed checklists”.
- 📄 Create PDF → send the file via “Share”. Documents, the registration document and the purchase price are never included. The extract is part of Orik Pro.
Current condition and tyres
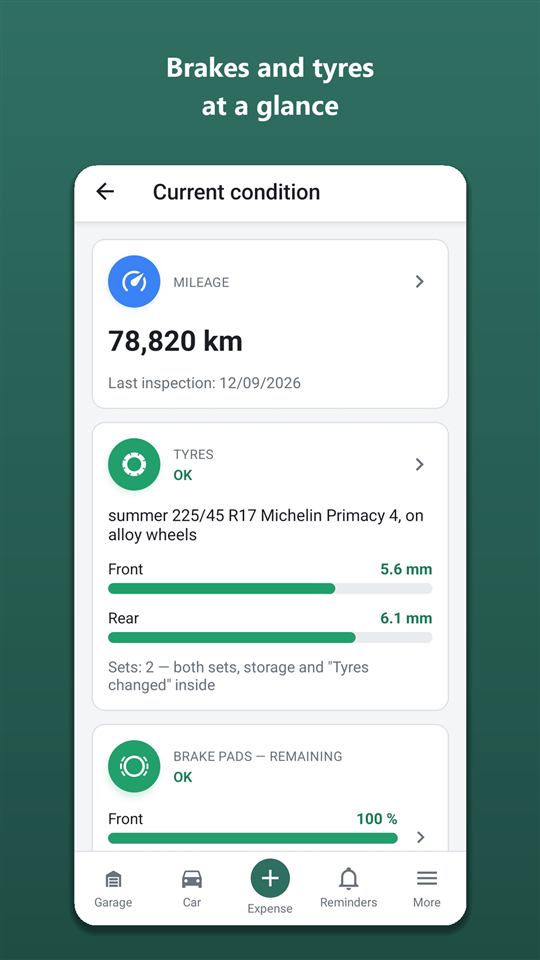
Dashboard → Condition. Cards: mileage, tyres, pads, discs, radiator, body. The circle colour is the worst axle: green — fine (50 % and more), orange — replace soon (20–50 %), red — replace now (under 20 %), grey — no data.
Add an inspection by hand
- Tap a card (e.g. “Brake pads”) — the history of readings opens.
- + New record → axle, value (remaining % or tread in mm), date, mileage, note, photo.
- Save. Tap an older record to open it — edit or Delete record there.
Values from garage visits arrive here automatically, marked “🔧 Recorded at a workshop visit”.
Tyre sets
The “Tyres” card → “Tyre sets” (or Tyres in “More”).
- + Add set: season Summer Winter All-season, winter sets can be “Studded”; size (width / profile / diameter); “Staggered?” if front and rear differ; brand and model; “On rims?” and which; “Fitted on the car now?”; photos.
- Save set. Up to two sets.
- Swapped yourself — Swapped myself: date, mileage, which set went on, tread of both and where the removed one is kept. Swapped at a garage — the “Tyres” block of the visit does it.
- Tread measurement — + Tread measurement in the set.
Tyre change by weather
Set the region in car details and add both sets. Orik checks the 16-day forecast: night frosts coming — a reminder to switch to winter tyres; steady warmth — to summer ones. Local laws are taken into account too (e.g. in Belarus, Latvia, Lithuania winter tyres are mandatory from a date set by law). No second set — Orik reminds you to buy one in advance, before prices rise.
- Tyre age (DOT): in the tyre set, enter the 4-digit production date from the sidewall (2319 = week 23 of 2019); the ⓘ icon shows where to find it. For tyres from 6 years old Orik suggests a check, from 10 — replacement: you’ll see it on the dashboard and in the trip checklist.
- Tyre storage — in the set card + Record storage, or from a photo of the receipt via 📷 Quick expense: where it is (garage, home, friends), from and until when, tread at drop-off, cost if paid (goes into expenses, not the service book; a reminder a week before the end). In Expenses, records from one place and one day are shown in one row.
- Set card — tap a set: tread, age, mileage on this set, where it is stored and its history — when it was fitted, removed, put into storage. Edit — Edit.
Mileage
Mileage history
Dashboard → tap the “Mileage” card (or Mileage history in “More”). Every odometer reading: fill-ups, visits, trips, inspections and checks, newest first, each with the difference. A reading lower than the previous one is highlighted — maybe a typo; tap it to open the record and fix it.
Check mileage
- → “📍 Check mileage” (or + Record mileage on the dashboard or in the mileage history).
- Enter the odometer figure — Orik shows a hint “My estimate — about N”.
- Save. Works offline too.
The car’s mileage updates by itself from fill-ups and visits. A check helps when you haven’t entered mileage for a while — e.g. when Orik asks “Check the mileage?”.
“≈” next to mileage
“≈” means the mileage is Orik’s estimate, not an odometer reading. Estimates don’t count towards fuel consumption or daily distance. Enter an exact reading and the sign disappears.
Reminders
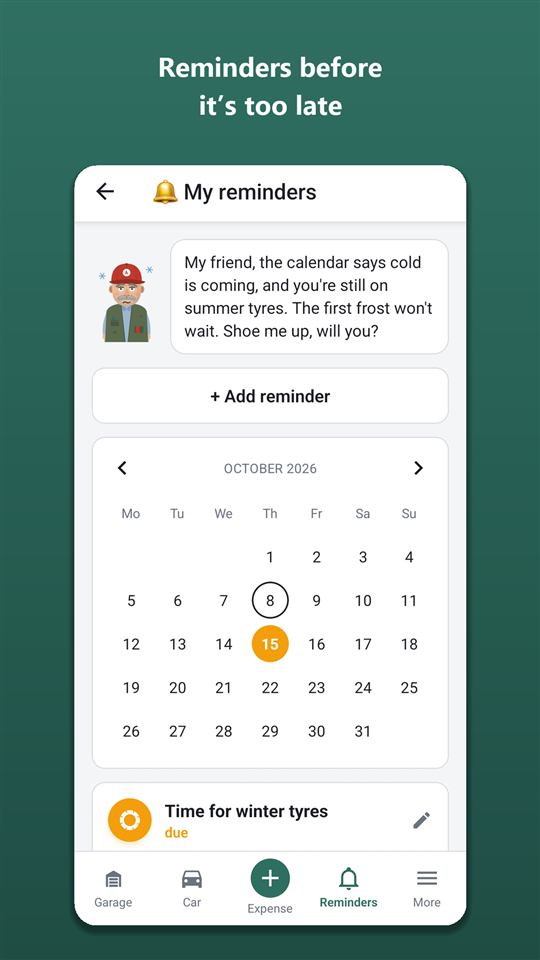
Open: Reminders on the bottom bar — all cars (choose the car at the top); from the dashboard — the “Next reminder” card — this car only.
The reminders screen
- Month calendar: days with deadlines are marked with the colour of the most urgent reminder. Tap a day to show only it; 12.10 — show all clears the filter.
- List: the most urgent first — “overdue”, “due”, then “planned” and “snoozed”. Mileage reminders show “N km left · ≈ date”.
Reminder buttons
- ✓ Done — finished, the reminder closes.
- Snooze → A week A month or Or until a date.
- Don't remind again — turn it off.
- Closed and turned-off reminders are at the bottom under “Done and turned off”; Restore turns one back on.
- Tap the top of a card to open the form: edit or Delete reminder.
Your own reminder
- + Add reminder.
- Car, “Remind about” (e.g. “Replace the wiper blades”), details, section.
- “By date?” — the deadline and “Remind in advance”: On the day A week before A month before. “By mileage?” — the mileage and At the mark 500 km before 1000 km before. You can use both — whichever comes first wins.
- Save.
Created automatically
Service by schedule and mechanic’s advice, insurance and inspection expiry, parking rent, loan payments, tyre change by weather and law, buying a second tyre set, recalls, seasonal car prep, fines with a discount, mileage checks. For mileage reminders Orik estimates the date from how far you drive per day.
Push notifications
They arrive every day at the chosen hour until you tap “Done”. The hour and the groups (service, weather and tyres, documents, parking, financing) are in Settings → “Notifications”. A group turned off sends no push, but its reminders stay in the list.
Statistics and cost per kilometre
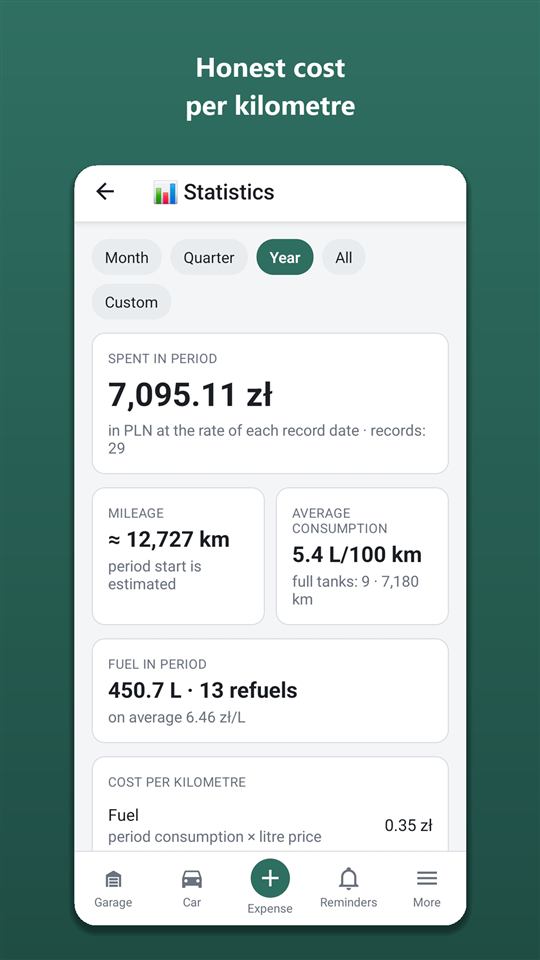
Open: on the dashboard tap the “Spent in period” card (or Statistics in “More”). Period — Month Quarter Year All Custom (for “Custom” — “From” and “To” dates).
What’s on the screen
- Spent in period — in the car’s currency at the rate on the date of each record.
- Mileage for the period (from odometer readings).
- Average consumption — only between two full fill-ups; below it, a consumption chart by fill-up: tap a bar for the date and value, orange bars are unusual stretches.
- Fuel in the period — litres, number of fill-ups, average price; “Saved with discounts”.
- Cost per kilometre: “Driving” — fuel plus service, parts and care over the whole ownership; “Ownership” — plus insurance, tax, tolls and loan interest. Fines never count.
- By category — a share bar and a list; tap a category to see its records for the period (and edit them).
- By month — bars for 12 months; tap a month for its total.
- Station shop in this period — a separate block: how much went on coffee and food on the road and what that comes to per 100 km. Not counted as spending on the car.
- Income for the period and profit from work, if you log income.
Year in review
In Statistics — 🎉 Year in review: pick a year — spending and the change from last year, mileage, the cost of each kilometre, consumption, visits, what took the most. Share the year — as text, Share as image — a card with Orik.
Export to Excel
- ⬇ Export expenses to Excel (or Export to Excel in “More”).
- Period, categories, for parts — all / bought separately / as part of a repair, and which sheets to include (full list, fill-ups, parts, workshop jobs, totals).
- Create and save or send the file. The export is part of Orik Pro.
Want every total in one currency? Settings → “Show amounts in”. The records themselves don’t change.
Consumption compared
Under the consumption chart — “Consumption in different weather”: every interval between full-tank fill-ups is sorted by the average temperature of those days in the car’s region — five bands, from frost below −10° to heat above +25° — and separately by tyre set. If you have two sets, you see the difference between them in the same weather, adjusted for temperature. Below that — petrol grades compared with the cost of 100 km. A band appears once it has at least 300 km of full-tank fill-ups; the car’s region must be set in car details.
Every statistics block has a “What’s this?” line with a little Orik: tap it and he explains what is counted and how. The first time, the explanation opens by itself.
“What it costs to keep the car” — how much goes out every month even if the car just sits (insurance, inspection, tax, rented space, loan and lease payments in full) and how much each kilometre adds (fuel, servicing, parts, roads). Based on records from the last 12 months.
“Still to come this year” — a forecast until 31 December: insurance and inspection renewals, tax, scheduled payments, rented space, the next scheduled service and tyre storage based on past amounts, fuel based on your average over the last 3 months. It updates with every record; sudden repairs aren’t included.
“Repairs and servicing: year on year” — workshop and DIY spending over the last 12 months against the year before, by car system (brakes, suspension, engine…); scheduled service is a separate line. It appears once the service book has records covering at least two years.
The Excel export has the sheets “Income” and, if VAT tracking is on for the car, “VAT for the accountant”.
Monthly budget
Dashboard → + Set a monthly budget: an amount for the month and, if you like, a separate one for fuel — in the car’s currency. The dashboard shows a “spent of budget” bar. When the month’s costs pass 80 % and 100 %, Orik tells you right after you save a record — no push, each threshold once a month.
Compare cars
Garage → ⚖️ Compare cars (Orik Pro; shown with two cars or more): cost per km, spending and distance over 12 months, fuel and maintenance per km, average consumption — side by side in one currency. Green marks the cheapest car.
VAT for business
“Vehicle details” → “VAT for business” → Track VAT: a default rate (by the car’s country) and how much VAT you reclaim. Then every record has a VAT field; receipt and invoice recognition fills in the amount, rate and country. Foreign VAT is marked separately — it is reclaimed through a separate procedure. A record can be marked “Accountant claimed the VAT?”.
The Show VAT switch (Orik Pro) in statistics, on the dashboard, in lists and trips shows amounts without reclaimable VAT: paid, VAT included, deductible, your cost. The Excel export has a sheet for the accountant. This helps with records; it isn’t tax advice.
- CO₂ emissions — under “Fuel for the period” and in the year in review: from the fuel you filled; for electric cars — by the power plant emissions of the country of the car’s region (EEA).
Trips
Open: dashboard → Trips. Tabs All Business Personal, with the month’s totals on top: trips, km, cost.
A trip right now
- + Add trip → Start now.
- Category (Business / Personal), purpose, starting mileage (the current one is filled in) → ▶ Start trip.
- While the trip runs, the dashboard shows “Trip in progress” — tap it at the end of the journey. A car has only one trip running at a time: until it’s finished you can’t start a new one “now” (a past trip is fine).
- ■ Finish trip: route (from, via, to) and mileage at the finish — and the cost is calculated.
Record a trip
In the Android app a trip can be recorded automatically: “Trips” → the “Record a trip” card → Record trip. Time, kilometres and stops are recorded: with an OBD adapter — from the car’s data (speed, rpm, fuel consumption if the car reports it), without an adapter — by location.
- You can lock the phone: while recording, the “Orik is recording your trip” notification stays in the notification shade. A stop for fuel or coffee doesn’t end the recording — drive on and the trip continues; after 2 hours parked the recording ends by itself. Finish trip — end it right away.
- The “Record the route” switch — the route on the map by location. The route is stored only together with the trip.
- At the end — a draft “Trip recorded — check it and save”: what kind of trip it is, the purpose (for business trips) → Save trip or Delete recording. Nothing goes into “Trips” until you tap it.
Only you start a new trip — with “Record trip”. With an adapter, a trip you started can carry on by itself after the engine was switched off — see “Auto-connect” in the “OBD adapter” section.
A past trip
+ Add trip → In the past → start and end, route, km → Save trip.
Kilometres
- By odometer — mileage at the start and at the finish.
- Enter km — type the number.
- 🗺 Route on map — “From”, + Waypoint, “To” (search, “I am here” or tap the map) → Done → Use as km.
Cost
Calculated when the trip ends and then frozen: fuel by your average consumption and price per litre (not by receipts), plus tolls and parking during the trip, plus the maintenance share per kilometre. Fines are a separate line. Changed something — ↻ Recalculate.
- Expenses near the trip — fill-ups, tolls and fines within ±1 day; tick what happened on the way and tap “Recalculate”.
- 🧮 Calculate this route — compare the trip with the calculator’s estimate.
- Trip map. If the trip was started from the calculator, the map shows the route variant you chose (for example, without toll roads or by ferry).
Business mileage log
In Trips — 📄 Business mileage log (Excel): period, driver, rate per km (optional) → Download Excel. Finished business trips with date, route, purpose and km go into the log. The log is part of Orik Pro.
Where I parked
Dashboard → Parking → 📍 Mark parking spot: a point on the map and a note (“level −2, space 45”), 📷 Photo of the spot. 🚶 Walk there — walk back to the car in Google Maps. “Parking payment”: +60 min or your own time — I remind you 10 minutes before the end; Add payment to expenses. Everything stays on the phone and works without internet.
Accident: what to do
Dashboard → Accident: what to do. 📍 Where am I? finds the country by GPS — offline too; the big red button calls that country’s emergency services. Then 8 steps: safety and the warning triangle, injuries, when you need the police, the accident report (what the form is called there), photos by checklist, the other party’s details (optional; reading their insurance from a photo — Orik Pro), calling your insurer from the policy, what next. Tap a step to tick it. Data and photos stay on the phone; ↗ Share accident details sends them to your insurer. In the accident statement step — Fill in the accident statement (PDF): a draft of the form with the same field numbers in the language you choose; your car, policy and licence are filled in automatically. The PDF (Orik Pro) is for the other driver and the insurer; it doesn’t replace the signed paper form.
How to pay for parking
On the “Where I parked” screen, under the pin, a “How parking is paid” card for the country you’re in: zones, disc and payment apps. The country is detected from the pin, offline too.
Airport
Dashboard → Airport: the nearest airport opens (by location, offline too); for another, tap “Another airport”. “Drop off / pick up” — how many minutes at the terminal are free and what longer costs; I’ve stopped at the terminal starts a timer, and I’ll remind you 2 minutes before the end. “Flying away for a few days” — dates, the airport’s official parking (if the airport publishes its tariff — the amount for your days), fuel there and back, a comparison with a taxi at your price, Remember where I left it — on the day you return I’ll remind you where the car is. Data comes only from official airport websites; where there’s none — a link to the website. If the trip calculator’s destination is an airport, a card linking here appears. The list covers every airport in Europe and Asia with scheduled flights; we check drop-off rules against official websites step by step, starting with the busiest for our users. If an airport’s rules aren’t checked yet, the screen says so — distance, the drive, Remember where I left it and the return reminder still work. Where drop-off is paid from the first minute, a free alternative nearby is shown.
- Flight board and my flight — on the “Airport” screen: Departures and Arrivals open the airport’s board (official or on Flightradar24); type your flight number (LO 379) in “My flight” to open its status in Google or Flightradar24. The number is stored only on your phone.
OBD adapter: fault codes, gauges, trips
A Bluetooth OBD-II adapter (ELM327 with Bluetooth 4.0 / BLE) plugs into the car’s diagnostic port — usually under the steering wheel on the left. It works in the Android app and is free; asking Orik about a fault code costs credits, like a regular chat. The app only reads the car’s data; the one thing it changes is clearing fault codes, and only when you tap it.
Connect the adapter
- Plug the adapter into the port and switch on the ignition.
- More → the “OBD” group → Connect an OBD adapter → Find adapter. Android will ask for access to nearby devices (Bluetooth) — allow it.
- Pick the adapter from the list. The first connection takes up to 20 seconds. After that the app connects to this adapter by itself when you open “OBD adapter”, “Diagnostics” or “Gauges”. Leaving the screen doesn’t drop the connection; if it drops, the app reconnects by itself. Disconnect — end the connection.
Adapter not found — check that it sits firmly in the port, the ignition is on and Bluetooth on the phone is on. You need an adapter with Bluetooth 4.0 / BLE.
After the first connection the “OBD” group of the “More” sheet has “Diagnostics”, “Gauges”, “Pre-purchase check” and “OBD adapter”.
OBD adapter
What the car reported: adapter and protocol, VIN, battery voltage, mileage — if the car reports it (most cars have no such command).
- VIN: Save VIN to car if the car details don’t have it yet. The control unit’s VIN may differ from the documents (this happens with locally assembled cars) — This is my car, and the app will remember it for this car.
- Mileage: Save reading — add it to the mileage history. The “Update mileage from car data” switch — once a day the mileage is recorded by itself, and the service schedule is calculated from the exact mileage.
- Settings: “Keep fault code history”, “Mark parking spot when engine is off” (the spot goes to “Where I parked”; location access needed), “Record the route”.
- Auto-connect: Off — connects when you open the OBD sections or tap “Record trip”; a trip you started keeps going while the app is running; Wait for the adapter — a trip you started isn’t cut short: switch the engine off, come back — the app reconnects to the adapter and carries on recording by itself, even if it was closed; Via car audio — choose the car’s head unit: if a trip you started is paused and the phone connects to it, you’ll get an “In the car?” notification — tap it and recording continues. Auto-connect never starts a new trip — only you do, with “Record trip”.
- Background work: Open battery settings → Autoracle → “Don’t optimize”. Otherwise the phone may put trip recording to sleep while the screen is off.
- Adapter communication log — if something isn’t working right, Send log to support: it shows what the car answered.
Diagnostics: Check Engine and fault codes
More → “OBD” → “Diagnostics”. Whether Check Engine is on, plus fault codes and pending codes (not confirmed yet). Check now — read them again.
- Ask Orik next to a code — the chat opens with a ready question: what the code means for your car, how urgent it is and what to check. Whether to send it is up to you; a message to Orik costs credits (Orik Pro).
- Freeze frame — the car’s readings at the moment of the fault (if the control unit stores them) and, if the fault appeared while a trip was being recorded, the minute of readings before it.
- Clear codes turns off Check Engine. Before clearing, the app warns you: if the cause isn’t fixed, the code will come back, and the inspection readiness monitors will reset — the car will need some driving to set them again. The codes are saved to the history before clearing (if it’s on). Better show them to a mechanic first.
- Reading history — date, mileage and codes of each reading; a record can be deleted. Share history — as text, for example to a mechanic; works without the adapter too.
- The “Show in service book” and “Show to buyer” switches (on the history page via the QR code) — off by default.
- Also here — the “Battery” card (voltage before starting, the dip when cranking and while driving — from trips recorded with the adapter) and “Fuel consumption sensor” (litres from the car’s data checked against “to full” fill-ups).
Gauges
“OBD” → “Gauges”: speed, rpm, engine temperature, fuel in the tank and voltage in real time; below — “More from the car”: only the parameters your car reports.
On the road
- While a trip is recorded with the adapter, the app warns you with a notification if the engine is overheating, the alternator seems not to be charging or Check Engine comes on (the new fault is saved with a freeze frame).
- The fuel level went up noticeably — you’ll get “Looks like you refuelled”: tap it and take a photo of the receipt.
- When a trip is recorded through the adapter, its litres come from the car’s data; “Statistics” has the “Engine running time” card: how long the engine ran and how much of that time standing still.
Pre-purchase check
“OBD” → “Pre-purchase check” (or Check a car before buying in “My garage”). Plug the adapter into the car you’re looking at, switch on the ignition, optionally enter the VIN from the listing and the mileage from the instrument cluster → Check the car. The app shows whether the codes were cleared recently (how many km, warm-ups and engine hours since the last clear), permanent codes that a scanner can’t erase, incomplete self-tests, Check Engine, whether the VIN and mileage match, and the battery voltage. Nothing in the car changes; checks are stored only on the phone. Share — the report as text, Ask Orik — what to ask the seller.
The check looks at the engine control unit and related systems via standard OBD. It doesn’t replace an inspection at a garage or a vehicle history check.
Trip calculator
Open: Trips → 🧮 Plan a trip or Trip calculator in “More”.
Estimate a trip
- “Which car” — This car or Another (rental, borrowed) (for another car — fuel type and consumption).
- 🗺 Route on map — set “From” and “To”, add waypoints if needed → Done.
- “Round trip?”, departure and return dates.
- Consumption and price are filled in from your fill-ups — you can change them. Tolls and parking — enter them if you know.
- Tap Calculate.
What the estimate shows
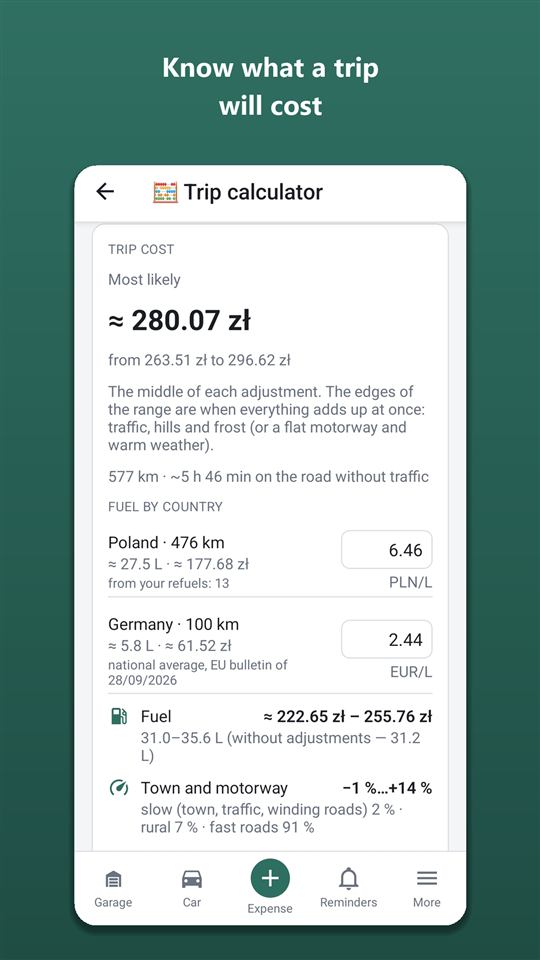
- Most likely — in large type, plus a range “from … to” (from a clear flat motorway in warm weather to traffic jams, mountains and frost).
- Fuel by country — litres and price in each country on the route. Where there is an official national average (the European Commission bulletin), we use it and show your refuels of the month next to it — “N% higher / lower”. Where there is no bulletin — your recent refuels, then the median of users’ receipts. No data — enter the price yourself.
- Route options — if there are tolls or a ferry on the way, “Fastest”, “No tolls” and “No ferries” appear under the total: km, time, cost and the difference. Tap one and the calculation is redone for it. Open in Google Maps sends the route to the navigator; for the no-tolls or no-ferries option turn on the same in Google’s route options.
- Stations, chargers and an overnight stop — each “Where to refuel” stop lists 2–3 real stations right on the road (tap to open the spot in Google Maps); “My fuel brands” — tick Orlen, BP and so on to see them first. For an electric car — fast chargers on the road (OpenStreetMap data without live status — check in the operator’s app). Over 9 hours at the wheel — we suggest around which km and town to stop for the night. Vignettes of the countries on the route are included in “Toll roads by tariff” (the cheapest for your dates). Route as a file (GPX) — for OsmAnd etc. sends the calculated route to a navigator.
- Adjustments: city and motorway, terrain (climbs), weather on your dates; maintenance; tolls.
- Electric — battery capacity and “Charging stops”.
Where to refuel
Under fuel — a refuelling plan by country: where and how much to fill so you don’t carry expensive fuel or run dry. It needs the tank size (from car details, or enter it) and “Fuel at the start” — Full ½ ¼. The saving is shown to everyone; the detailed stop plan is part of Orik Pro.
Rules on the road
For each country on the route on your dates: winter tyres and studs, daytime lights, default speed limits (tap to expand), vignettes and tolls with links to official sites, low-emission zones, camera tolerance and fine discounts.
Without Orik Pro this block has links to the official traffic codes of the countries and the red warnings (for example, if a car with your registration won’t be let into a country); the rest of the summary and “Default speed limits” are in Orik Pro. In countries where AI is unavailable, it’s free.
Buttons under the estimate
- ↗ Share the estimate — as text to a messenger.
- ▶ Start a trip on this route — the trip form with the points and km; the estimate is saved to the trip.
- Pre-trip checklist — what to check for this particular trip.
- Opened the calculator from a trip — 💾 Save the estimate to the trip and the “Compared with the trip” block.
Split, PDF and toll roads
- Under the total there is “Split between, people”: enter how many of you there are to see the amount per person.
- ↗ Share the estimate sends the calculation: total, toll roads and links; the refuelling plan and the rules summary come with Orik Pro. PDF / print — the same calculation as a PDF or printout (Orik Pro).
- Only toll roads that are actually on your route are shown. Other countries come as one line — tap More if you take another way. Below are links to the official traffic codes of the countries on your route.
Weather, equipment, parking
- Weather on the way — by day and country, only the big things: snowfall, freezing rain, ice, heavy rain, wind gusts, heat. The forecast appears 16 days before the trip.
- What to carry — mandatory equipment in each route country (triangle, vest, first-aid kit, extinguisher, bulbs) and what only local cars must have.
- Parking — what line colours and zones mean, where you need a parking disc, which apps take payment.
Ferries
If the route includes a ferry or a car train (Le Shuttle), it is shown separately: the line, km and time, plus time for boarding. Crossing kilometres don’t count towards fuel or wear. Enter the ticket price and it goes into the total; the button opens the operator’s timetable, Add the ticket to expenses saves it under “Tolls & parking” → “Ferry”. Routes come from the open OpenStreetMap: it doesn’t know every ferry and sometimes drives around by land — then add the departure port as a waypoint.
The map picks the fastest route and doesn’t know every ferry, so, for example, from Poland to Sweden it goes by land. If there’s a ferry line in the direction of your route, a “You can go by ferry” block appears under the calculation: tap a line and the route is recalculated to the port, across by ferry and from the port, with a comparison to the land route next to it.
Toll tunnels, bridges and city charges
The calculator works out toll sections on the route itself — the “Toll roads by tariff” line. Exact, from the operators’ tables: Polish A1, A2 and A4 (from entry to exit), tunnels and bridges with a known price — Brenner, Tauern, Arlberg, Mont Blanc, Fréjus, Great St Bernard, Øresund, Millau and others (for a round trip — the return ticket, if it is cheaper). Approximate, at the average rate per km and marked “≈”: toll motorways in France, Italy, Croatia, Portugal, Greece and Serbia. Anything not covered (parking, other roads) goes into “Other tolls and parking”. How to pay and the official website are in “Rules on the way” and the trip checklist.
My calculations (Orik Pro)
- Below the result — “Calculation name” and Save calculation: route, dates, what you entered and the figures of that day go to My calculations (“More” → “On the road” or the bookmark icon in the calculator header).
- Tap a saved one — the calculator opens with the same route and dates; Calculate recalculates at today’s prices and weather, Update saved calculation keeps the new figures. Rename and delete — in the list.
- Result blocks — fuel by country, where to refuel, rules, speed limits — are collapsed; tap the title to open. Weather and rules with something important open by themselves.
- The car’s country of registration (car details; for “Another car” — its own field) changes the rules: where you need a Green Card or border insurance, whether BelToll in Belarus or the Moldovan vignette applies, local insurance in Georgia and Kosovo, which equipment to carry.
- EU border. If the route goes from the EU to a non-EU country or back, “Rules on the way” shows a reminder: duty-free allowances into the EU (goods, alcohol, cigarettes — with a lower limit in border countries), fuel only in the tank plus a canister up to 10 l, cash from €10,000 must be declared, car documents. Cars registered in Russia get a warning about the EU entry ban.
- Entering non-EU countries. For each non-EU country on the route — its customs: limits on goods, alcohol and cigarettes, fuel, cash, how long the car may stay and what you need if the car is not yours. Belarus, Russia, Kazakhstan, Armenia and Kyrgyzstan — one item under the common EAEU rules: a foreign-registered car is declared in writing on entry and again on exit. Belarus-registered cars — separately: into the EU only with the owner.
Route from Google Maps
Plan a route in Google Maps → “Share” → Autoracle → pick the car and what to do: Calculate trip — the calculator with this route; Record trip — a new trip with the route’s points and distance. If the link can’t be read, the form opens empty — you can enter the points yourself.
Service schedule
Open: Service schedule in “More”. A schedule is what to replace and when, as the manufacturer says. It drives the service plan and one reminder about the next service.
Get a schedule
- A ready one (free): 🔎 Find the schedule. If an owner of the same car already has a service book in Autoracle, you’ll see “Found a schedule…”: ✓ Yes, use this schedule or Not my car — search the web.
- From your own service book (Orik Pro): 📄 Load from your own book → photograph the pages with the schedule table → 🔍 Recognise. Check the items: correct intervals, remove extras with ✕, add missing ones with + Add an item that is missing → ✓ Correct — into the plan.
- Web search (Orik Pro): 🌐 Search the web — 1–3 minutes; the result is an “AI draft”, check it against the book.
- By hand (free): tap an item and enter the interval in km and/or months.
Set up the plan
- Operating conditions: Normal / Severe (short trips, traffic, dust, taxi, frost) — severe means shorter intervals.
- Mandatory items (oil, timing belt, filters, plugs, fluids — by fuel type and drivetrain): missing from the schedule — enter an interval or mark it “Not required”.
- When it was last done — taken from workshop visits; if not there, enter the mileage and date or “Don't know — count from today”.
Next service
The “Next service — at N km” card: what it includes and how many km are left. Remind me about service turns the reminder on. 📅 Service schedule › — every future service by number. Checks at service time are in a collapsed list.
A workshop visit marked “Scheduled service” closes the reminder and sets the next one — nothing to tick by hand.
Chat with Orik
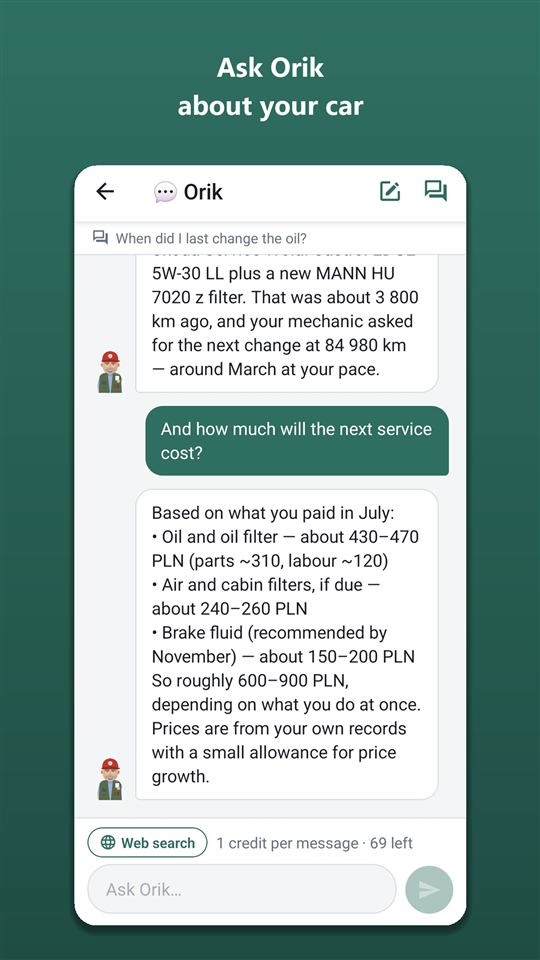
Open: tap Orik in the bottom right corner of the dashboard (or Chat with Orik in “More”). Orik knows your car: visits, spending, consumption, condition, reminders, documents.
Ask a question
- In an empty chat tap a ready question (e.g. “How much will the next service cost?”) — it goes into the input field where you can edit it.
- Or type your own in “Ask Orik…”.
- Tap — the answer appears as it’s written.
Web search
The Web search toggle next to the input: turn it on for part prices, reviews, recalls — the answer comes with a range and source links. It turns itself off after sending.
Conversations
- in the header — a new conversation (Orik won’t carry the old one along — it’s cheaper).
- — all conversations by day; search by title (and by text — with the search button), rename, delete.
Good to know
- Orik only answers and tells you what to record and where — he never saves anything himself.
- For faults — only “likely causes”: an exact diagnosis comes from a mechanic. Brakes, steering, tyres — straight to a mechanic.
- Price: 1 credit per message, up to 3 with search (Orik Pro). Your credit balance is shown above the input.
Shared car and mechanic link
Open: Members in “More”. Free — the owner plus one person; with Orik Pro — no limit.
Invite someone
- + Invite.
- “Role”: Member — sees everything, adds their own records, can edit car details (family, second driver); Viewer — sees everything, changes nothing (accountant, whoever pays).
- “Email (optional)” — the invitation arrives by email; no account — one is created automatically.
- “Access” — No end date or Until a date.
- Create invitation → a code and QR appear. ↗ Send the code — share it to a messenger. The code is valid for 7 days and works for one person.
Accept an invitation
The other person: More → Accept invitation → enter the code and tap Accept or 📷 Scan QR. The car appears in their garage marked “👥 Shared”.
Manage members
- For a member: Make viewer / Make member, Remove.
- An unused invitation — Revoke.
- A member leaves with Leave this car.
- Private record — forms of a shared car have a “Private record” switch: only the author and the owner see it.
- Records in a shared car show who added them: “👤 Anna”.
Mechanic link
The mechanic needs no app and no account.
- In “Share history” — Create a link for the mechanic.
- “Mechanic or workshop”, “Mechanic’s email” (optional), “Valid for” — 1 day A week A month Until revoked.
- Create link → the mechanic points their camera at the QR or gets the link: Send the link.
- The mechanic sees the car’s specs, service history (without prices) and condition, adds a visit or an inspection, and can recognise the work order (your credits).
- You get a push and a “From the mechanic” banner on the dashboard. A visit: Review and save opens the visit form filled in by the mechanic; an inspection: Accept. Disagree — Reject.
Nothing reaches your car without your “Accept”. You can revoke a link any time — Revoke under “Active links”.
Share history: QR sticker and mechanic link
Open: More → Share history (the “Car and documents” group). Free. There are two different codes here: the sticker lets anyone see the service history, the link lets your own mechanic add records right away.
Sticker on the car
A permanent QR code of the car. A mechanic or buyer points a phone camera at it and an autoracle.app page opens with the service history: what was replaced, when and at what mileage.
- Visible: make, model, year, VIN, workshop visits and self-service records from the service book, works and mechanic’s comments, parts (name, brand, part number), outstanding recommendations, condition, recalls, mileage chart.
- Never visible: prices, documents, licence plate, photos and files, private records, refuelling and other expenses.
- Confirmation marks “VIN confirmed by the registration certificate” and “confirmed by a workshop document” are set by the server when the VIN on a recognised document matches the car. Correcting your own records is fine.
- Open the page — see the page as others do; Send the link — send the link.
- “Sticker language (with a small English line below)” — by default the language of the car’s country.
- Sticker (PDF) or A4 sheet — 12 stickers → print on self-adhesive waterproof film or at a copy shop.
- Where to stick it: the top of the driver’s door pillar or under the bonnet on the panel above the radiator.
- Turn off “Show the history via the QR” and the QR shows only the car. Reissue the code — the old QR and stickers stop working immediately.
Access requests via QR
Nothing can be recorded through the sticker. The page has a “Request access” button: the person chooses “Mechanic / workshop” or “Buyer” and enters a name and phone number — you get a push.
- In “Access requests” — For 1 day, For a week or Decline. Tap the phone number to call.
- Once approved, the mechanic goes straight to the visit form — records come to you for confirmation. The buyer sees the history even if it is hidden.
- Close access — revoke access early. At most 5 requests a day per car; the name and phone number are deleted 30 days after your answer. No requests wanted — turn off “Accept access requests via the QR”.
Link for your own mechanic
For a regular mechanic — a link that lets them add visits and inspections right away, without requests. It is further down the same screen, as described in “Shared car and mechanic link”.
Selling the car? “Preparing to sell” has the same sticker: show the QR to the buyer or send the link.
Documents and the “Garage safe”
Add insurance, inspection, registration
- → “📄 Documents” (or “Car details” → + Add document).
- Photograph the policy (all pages) and tap 🔍 Recognise — the number, dates, insurer and contacts (hotline, agent) are filled in.
- Check: document type Insurance Inspection Registration, country (Other… — search all countries), “Valid from / until”, cost (a free document — 0).
- “Remind a month before it ends?” — Yes. Save.
A new policy of the same type and country closes the reminder about the old one by itself.
A document with no expiry (for example, a registration certificate): “Validity” → No expiry — registration is set this way by default. There is no renewal reminder, and the cost is counted once: in statistics and cost per km, but not in the monthly cost of keeping the car or the forecast to the end of the year. Has an end date — Until a date.
Paying in instalments
- In the document form, “Payment” → In instalments; “How often” — Monthly Quarterly Every six months; “Number of payments” (by default — from the document’s validity).
- “Amount of one payment” — a single payment; “Date and time” — the day of the first payment.
- “How to record payments”: Automatically on the due date — the payment appears in expenses by itself (if the bank took a different amount, edit the record); Ask me — on the due date you get a reminder: in Reminders tap Paid — record … or Skip.
Each payment is an expense in “Documents”, and there is no separate full-price expense — statistics and cost per km don’t count anything twice. The renewal reminder a month before the end stays separate, as before.
Insurance claim
“Car details” → tap the policy → + Insurance claim: date, what happened, claim number, status Filed In review Paid Rejected, payout and your own share, the repair (a workshop visit), files → Save. Update the status as the claim progresses.
Garage safe
Dashboard → Garage safe. Valid documents and the registration document on one screen: number, validity, issuer, contacts. Files are copied to the phone — they open at a border and without signal. Open the safe once with internet; after that the copies update by themselves. Tap a file → Open to open it in a phone app.
My documents in the safe
The safe opens from the garage (Garage safe), the dashboard and More. At the top — “My documents”: + Add a personal document — driving licence, international permit, health insurance or “Other”. For each one choose where it is kept: In the Autoracle cloud — survives a new phone; Only on this phone — nothing reaches the server, but if the phone is lost the document can’t be restored. Set “Valid until” and I’ll remind you a month before. Below — car documents: All cars or one car. Vehicle members never see personal documents.
Warranties
Warranties in More (Orik Pro): + Add warranty — what is covered, where it was bought, from when, until what date and/or mileage, conditions, a photo of the warranty card. I remind you a month (or 1,000 km) before it ends. Recognise a receipt or work order that states a warranty — the form shows “Warranty found…” with a switch, and the warranty is saved with the record. Warranties you already added stay visible without a subscription.
Policy details
For insurance the policy details are recognized too: policyholder and address, registration number, VIN and make of the insured car, Green Card number — the “Policy details” block in the form, all editable. If the plate or VIN in the policy doesn’t match the car, Orik asks whether it’s the right policy. These details go into the accident statement if an accident happens.
Loyalty cards
Open: “My garage” → Loyalty cards (or Loyalty cards in “More”). Loyalty cards of fuel stations, garages, car washes and parts shops — to show the barcode at the till. Bank cards don’t go here.
Add a card
- + Add card.
- Name (“Orlen VITAY”), “Used for” — Fuel Service Tyre service Car wash Parts Parking Other, and which car.
- Code: 📷 Scan barcode / QR — point the camera at the card; or type the number and choose “How to show at the till” — Barcode EAN-13 barcode QR code No code.
- Card photos — the first (front) is shown on the tile in the list; the app also tries to read the barcode from the photo.
- Save.
At the till
Tap the card — the code is drawn on the screen and brightness goes to maximum. Below the code — ⛽ Log refuel (for a garage card — 🔧 Log visit): the record opens for the right car. Cards work offline.
Many cards? Filter by type and search above the list.
Moving from another app and handing over a car
Import from Fuelio, Drivvo or your own spreadsheet
Open: Settings → ⬇ Import from another app (or “Car transfer” → “Service book from another app”).
- Fuelio: in Fuelio — menu → “Backup” → “Send to Google Drive”; here Choose file → on your Drive, the Fuelio → sync → vehicle-1-sync.csv.zip folder.
- Drivvo: in Drivvo — “History” → “Export” → “Share” → save the file; here Choose file.
- Your own spreadsheet (Excel .xlsx or CSV): Choose file → “Is the first row column names?” → pick a column for each field (date, amount, mileage, litres, price, record type, description, filled to full, station) — the app guesses from the headers, check them → “Date format” → Next — choose the car.
- The app shows what it found: fill-ups, expenses, visits, readings, reminders, income.
- “Transfer to” — an existing car or New car (name and make); “Currency of the amounts in the file”.
- Transfer. Importing the same file again is safe — no duplicates.
Sold your car — hand the history to the buyer
- Car transfer in “More” → “Sold your car?”.
- “Which car” and “What to transfer”: service history, inspections, tyre sets, service plan, completed checklists. Documents, fill-ups, trips, spending, prices and photos are never transferred.
- Get a code → Send the code to the buyer. The code is valid for 7 days, once.
- When the buyer enters it you get a push. In “Car transfer” tap Deal done — hand over or Reject. Your own car doesn’t change.
Bought a car — get its history
“Car transfer” → “Bought a car?” → “Code from the seller”, purchase date and price → Get the car. Once the seller confirms, the car appears in your garage; the status is under “My requests”, Check status. The previous owner’s visits are marked “from the previous owner” in the service book.
Preparing to sell
Preparing to sell in “More”: what the car has cost you (in total and per month), the PDF extract and history transfer for the buyer, “Before the sale” and “After the sale” checklists — tap an item to expand its explanation; ticks are saved.
Simply Fleet: make a backup in Simply Fleet → here Choose file → the file Simply_Fleet_Backup_….zip.
aCar, Spritmonitor, Fuel Manager, Car Expenses: where to get the file in each app is shown on the import screen; then the same: Choose file → open it.
Checklists
Open: Checklists in “More”.
Before a trip
The top card “Before a trip” builds itself from the car’s data: brake and tyre wear, tyre season on the trip dates, reminders, insurance and inspection validity, countries on the route (vignettes, Green Card, rules), what to take. Opened from the trip calculator, the route and dates are filled in. Tap items to tick them; Clear all ticks — start over.
- Orik’s comment (Orik Pro, 2 credits): Ask Orik · 2 credits — Orik looks at the list together with the car’s history and adds what matters most for this trip.
Your own checklist
- Under “New checklist” pick a template: Winter prep Summer prep Pre-purchase inspection Before a shift or My own list.
- Tap items to tick them — ticks are saved at once and visible to every member of the car.
- next to an item — “What to check and how”.
- Edit — rename, rewrite or remove items, add your own → Save.
- Start over clears the ticks (a completed run stays in the history). Delete checklist removes it.
A fully completed checklist goes into the history: on the checklist screen (“Completed before”), in the service book (the “Checks” filter) and, if you choose, in the PDF. Before each season Orik reminds you and opens the right checklist.
Search and achievements
Search records
Search records in “More” → type a word (station, garage, part, part number, job, policy number) → Search. Tap a result to open the record. Search needs internet.
Achievements
Achievements in “More”: 10 categories — fill-ups, full tanks, different stations, garage visits, recognitions, reminders on time, trips, mileage checks, documents, days with Autoracle. Each has 5 medals from bronze to diamond and its own rank; below the bar — how much is left to the next one. Orik celebrates a new rank in the garage. Imported records don’t count.
Orik shows a new rank right away — in a window over the current screen, with confetti.
Without internet
- Works: new expenses (with photos), mileage checks, viewing screens (the last loaded version), loyalty cards, the garage safe.
- A record made offline goes into a queue and is sent automatically once you’re online. While the queue isn’t empty, a status bar is shown at the top.
- A record rejected by the server — the bar offers Try again or Delete.
- Online only: recognition, chat with Orik, editing and deleting records, adding a car, income, the trip calculator.
You can sign out or delete a car once the queue is sent — otherwise records would be lost.
Free and Orik Pro
Open: Orik Pro in “More” or Settings → Orik Pro — details. There — your status, credit balance, prices, purchasing, promo code.
Free forever
All manual records of expenses and trips, statistics and cost per kilometre, the service book, current condition, reminders (with the service date forecast and tyre change by weather), the trip calculator, a manual service schedule, offline mode, “Download my data”, a car shared by two.
In Orik Pro
Everything powered by AI — for credits: recognition of receipts, documents, registration documents, work orders; a schedule from your service book and web search; chat with Orik. And without credits: the PDF extract, Excel export, “Where to refuel”, a shared car without limits. The subscription includes 30 credits for each month, counted from the day you subscribed (unused ones expire at the end of that month); credit packs never expire.
Prices in credits
Fuel receipt — 1; policy, registration, fine, parts receipt — 2 (+1 per page beyond two); work order — 5 (+2 per page beyond two); schedule from a service book — 15; schedule web search — 10; a message to Orik — 1 (+2 with search). If recognition fails, the credits are refunded automatically.
Subscribe
- In the Android app open “Orik Pro” — the prices there come from Google Play, in your country’s currency.
- Under the prices — Subscribe (month) or Subscribe (year). Google Play shows the payment window — confirm.
- In a few seconds Pro and the credits appear by themselves: “Done, thank you! Everything is in place.” If the payment is still being confirmed, the app says so — everything appears as soon as Google confirms it.
Credit packs
“Glovebox” (50 credits), “Boot” (150) and “Trailer” (250) — in the “Credit packs” block, the button with the price. They can be bought while you have an active subscription; credits from packs don’t expire and stay after the subscription ends.
Renewal, cancellation, restoring purchases
- The subscription renews automatically through Google Play. To cancel it or change the payment method — Manage subscription in Google Play on the “Orik Pro” screen (or in the Google Play app → “Payments & subscriptions”). After cancelling, Pro works until the end of the paid period.
- New phone or reinstalled the app — sign in to the same Autoracle account and tap Restore purchases (with the same Google account you bought with).
- Refunds — under Google Play’s rules. After a refund, Pro from that subscription ends, and the unspent credits of a refunded pack are removed.
The subscription is tied to your Autoracle account and works wherever you’re signed in — in the web app too. It can only be bought in the Android app.
Promo code
On the “Orik Pro” screen → the “Promo code” field → Apply.
In countries where AI isn’t available (e.g. Belarus), recognition and chat are off and the rest of Pro is free.
Settings, data and security
Open: “My garage” → Settings (or Settings in “More”).
Profile
- Photo, name (Save name), email.
- How Orik should address you — Boss (he) Boss (she) My friend.
- Language — follows the phone by default; below it — Suggest a translation fix.
- Country — the currency of new cars and Orik Pro prices.
- ⬇ Download my data — all your records in one Excel file, free.
Summary currency
“Show amounts in” — In each car's currency or one currency for every summary (garage, dashboard, statistics, trips). The records themselves don’t change; Reset on the screens goes back to the car’s currency.
Notifications
Allow notifications (if they’re off), groups: service and maintenance, weather and tyres, documents, parking and rental, financing; “Send at” — the push hour.
Security
- PIN lock — turn it on and choose a 4-digit PIN: the app asks for it at launch and after a minute in the background. Fingerprint or face — instead of the PIN. Change PIN. Forgot the PIN — on the lock screen Forgot PIN? Sign in with password.
- Change password — the new password twice → Change password.
- Sign out on all devices — if you lost your phone or signed in on someone else's device. You will be signed out everywhere, including this phone; on other devices — within an hour. Sign out on all devices.
Privacy
“Usage statistics” and “Crash reports” — no amounts, texts or car data; turn them off and nothing is sent.
Icon menu (Android)
Touch and hold the Autoracle icon on the home screen to see a menu of sections: “Quick expense”, discount cards, parking, mileage check, trip, accident. Choose which ones to show (up to 4) in Settings → “Icon menu”. You can drag a menu item onto the home screen as a separate icon. The section opens for the last car you used; if PIN sign-in is on, the app will ask for it.
Import, about, sign out
- ⬇ Import from another app — see “Moving from another app”.
- “About”: website, pricing, privacy policy, terms, How to use (help), Contact support, Share the app, Rate on Google Play, version.
- Sign out — after the queue is sent.
Delete account
At the bottom of Settings — Delete account…: the app shows what will be deleted (your cars with all records and files, leaving other people’s cars, your profile). Type your email → Delete forever. It can’t be undone.